VETSCAN HM5
Returning an HM5
Please review the instructions below to save your data, prepare your HM5 for safe shipment, and ensure you don’t send items you should keep.
If you DON’T transmit your results to a Practice Management Software (PMS), you may want to save them to a USB drive. If you do send to a PMS and you are confident all the results have transmitted successfully, skip this section.
- Plug a smaller (4GB or 8GB) USB drive into your computer, right-click on the drive and go to Format, Format to FAT32. Eject the drive from your computer and plug it into the HM5.
- Go to Database from the home screen, then check the top-most box on the left. This will select ALL your results. Go to Manage at the bottom of the screen, then Backup, then Save. This may take up to 45 minutes if you have thousands of results, so you may want to do this at the end of the day.
To protect the electronics in your analyzer from the reagents currently in it, it is important to drain the fluids before shipping it. There are two ways to do this:
- The best option, when possible, is to follow the Prepare for Shipment instructions on the analyzer’s screen. To do this, go to Exit from the home screen, then select Prepare for Shipment. The analyzer will walk you through the process of flushing the analyzer with distilled water. Once it has been flushed, the analyzer will drain itself and prompt you to turn it off.
- In situations where the above processes cannot be run because an issue with the analyzer is preventing it (black screens, pressure errors, or certain fluid errors), you will have to manually drain the analyzer.

a. To manually drain the analyzer, open the door on the back of the analyzer and push all the pumps up. The pumps look like syringes. Now you can remove the reagent lines from the back. Make sure to hold the lines up so the fluid drains back into the bottles. Otherwise, it can spill onto the counter and drain the bottles.
Push up on the metal screws at the bottom of the plungers to push the fluid out of the syringes.
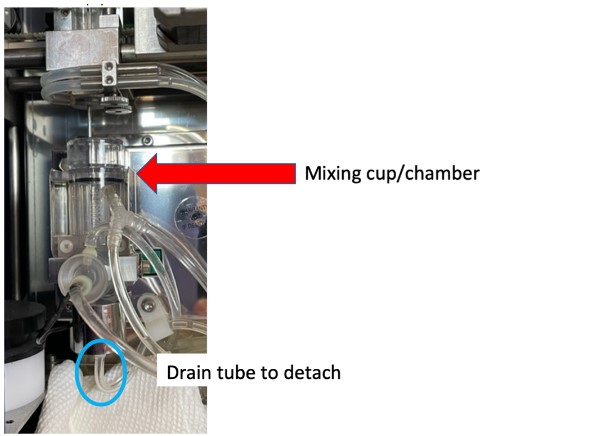
b. Next, drain the fluid from the mixing cup in the side door area. Open the side door, put a paper towel under the clear cup and pull the tube off the bottom to allow the fluid to flow onto the paper towel.
c. Last, move the needle up and out of the cup/chamber by pulling up on the bend at the top of the needle. This is also in the side door area.
- After unwrapping your replacement HM5, open the side door and remove the piece of tape on top of the mixing cup/chamber and remove the foam from around the needle. These can be placed in your analyzer for shipment back to our repair department.
- Before running the blank, go to Settings from the home screen, then Admin Settings, then Schedule Settings and hit Reset at the bottom right. Hit Accept, Accept, then hit Home. This will reset the cleaning timers so you don’t have to clean the wash head or perform the soak cleaning right away. Then go to Settings, Date and Time and make sure that is correct.
- Then, select Maintenance from the home screen and go through the Change Reagent Pack process to install the reagent pack, even if it’s partially used.
Discover the difference Zoetis Diagnostics can make in your clinic
Contact us today to learn more about how our diagnostics portfolio can help you provide elevated patient care.
Customer Service, Support & Ordering
Mon – Fri: 8:30am – 6:30pm ET
Vetscan and i-STAT Technical Support
24 hours a day, 7 days a week, 365 days a year
1-888-963-8471
Zoetis Reference Laboratories Customer Service, Support & Ordering
Monday – Friday: 8:00 AM – 8:30 PM ET
Saturday: 9:00 AM – 5:30 PM ET
Sunday: Closed
1-888-965-9652
Need Technical Support?
Our support team is available to answer product questions and provide guidance.†
* If you are a pet owner looking for treatment recommendations, please contact your veterinarian.